DELIVERY just £9.95
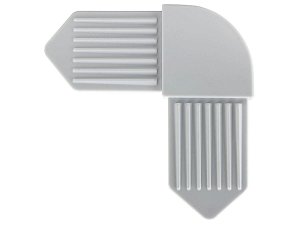
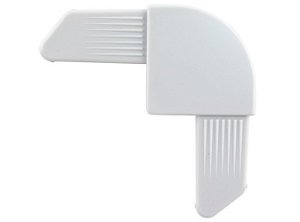
9295B SUB15 Moulded Push In Corner 500 pack for 125 Frames


9295B SUB15 Moulded Push In Corner 500 pack for 125 Frames
Moulded Push In Corners for joining SUB15 Sub Frame profile
Aluminium sub frame profile is cut and joined to make a frame; the frame is bonded to the back of a printed panel and hangers are fitted to the frame.
The Sub Frame does three things:
1. Provides a way to hang the panel on normal picture hooks.
2. Makes the panel more rigid and substantial.
3. Spaces the panel away from the wall, by 15mm or 25mm depending on profile chosen. Gives an attractive ‘shadow gap’.
Choosing a Sub Frame
SUB15 Pre-Taped: Supplied with a strong bonding tape pre-applied; the tape is tissue-based and can be cut without leaving residue on saw blades. Choose this for smaller panels and lighter substrates such as Chromaluxe. Gives a 15mm shadow gap.
SUB15: Apply our Heavy Duty Bonding Tape to the profile once it has been cut and assembled into a frame. Choose this for larger panels and heavier substrates such as acrylic. Gives a 15mm shadow gap.
SUB25: Apply our Heavy Duty Bonding Tape to the profile once it has been cut and assembled into a frame. Choose this for larger panels and heavier substrates such as acrylic. Gives a deep 25mm shadow gap.
Calculating the size of a Sub Frame
Allow for a border between the sub frame and the edge of the panel. On average this will be 25mm but can be less on a smaller panel. You will also need to allow for the width of the Moulded Push In Corners at each end. To work out the size of pieces you need to cut / order on Chop Service:
Panel length mm – (Border mm x 2) – (27mm x 2) = Sub Frame Length mm
Panel width mm – (Border mm x 2) – (27mm x 2) = Sub Frame Width mm
Cutting a Sub Frame
Sub Frame profiles are available in two formats:
- 3m lengths to cut on your own saw
- Bespoke cut to size on our Chop Service. Order Chop Service online.
Joining a Sub Frame
Join the sub frame with our Moulded Push In Corners - these corners have a rounded shape to avoid damaging the panel if it bends in transit. The corners just push into the ends of the profile with a friction fit, making frame assembly quick and easy.
- SUB15 Moulded Push In Corner for SUB15 profile
- SUB25 Moulded Push In Corner for SUB25 profile
Available in bulk or in frame kits including hangers and cleaning wipe.
Cleaning & Preparation
All surfaces must be cleaned and degreased using an Isopropyl Alcohol solution before bonding tape is applied; this includes the back of the panel and the Sub Frame profile if applying Heavy Duty Bonding Tape. This process is essential to ensure a strong bond.
Bonding the Sub Frame
Using pencil marks or a jig, ensure the sub frame is centred on the back of the panel.
Peel the silicone release paper off the bonding tape and press the frame down into position. Apply strong pressure and then leave to cure for 24 hours. Always work at room temperature as cold temperatures can reduce the effectiveness of the adhesive.
Finishing the Sub Frame
Slot CWH3 Hangers into the sides of the sub frame so that the panel can be hung on normal picture hook. The hangers are easy to adjusts for height and level by loosening the grub screws. Never hang a Sub Frame from the top bar as this can cause the adhesive to frame. Do not put wire or cord between the hangers as the sawtooth can cut through. T Screw security fixings can also be used for locations such as hotels and restaurants.
CWH3 Hangers are available in bulk or in individual frame kits.
Apply bumpers to the bottom corners of the Sub Frame to protect the wall.
Also in the Range View Range

More Like This
Questions
Please feel free to ask any questions about this product.